Zylo Tips: Getting Started with Dashboards & Custom Widgets
Table of Contents Toggle3 Pre-Built Dashboards in ZyloAnalytics DashboardZylo Value Framework...
Back
Back
Search for Keywords...
Blog
Table of Contents
As we’ve discussed in other tips, monitoring and reporting on your SaaS Management program is important to track progress, prove program value, and help justify your investment into SaaS management.
Let’s say you want to create a license management dashboard for your Software Asset Management (SAM) team, and you have a strong vision for what you want it to include. Zylo’s Dashboards & Custom Widgets makes it easy to create a dashboard from scratch, aligning to your specific use case.
However, if you want an easy starting point, you can easily duplicate existing dashboards – either pre-built by Zylo or your teammates – and customize them to your liking.
To build a dashboard, go to Dashboard Settings, which you’ll find in the Dashboards dropdown on the top left of the Analytics page. In addition to seeing Dashboard Settings in this dropdown, you’ll also see all of the different dashboards you have access to. The Dashboard Settings page provides a detailed view of all of the dashboards that either you have created or someone else on your team has created and shared with you.
To begin, click on the Create New Dashboard button on the top right corner. That will open a popup box, asking you to name the dashboard and give it a description.
If you’re just building a dashboard for yourself, something like “Thom’s New Dashboard” is fine. But if you plan to share the dashboard with your team, choose a name that would make sense to your organization and allow users to easily understand what this dashboard is and its goals. In this case, let’s call it “SAM License Dashboard.”
Now that you’ve created the dashboard, you have a blank canvas to work from. Click on the pencil icon in the top corner to edit and find the widget library. The widget library provides widgets and modules you can add to your blank canvas.
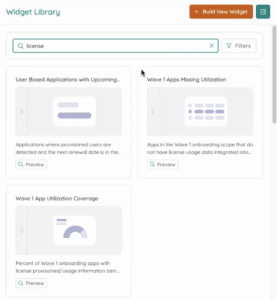 Widgets – individual reporting objects that contain a single data point and visualization, aligned to real world use cases that are driving value for customers today
Whether you’re in IT, SAM, Procurement, or Finance, you’re going to find something valuable in the widget library. To find widgets or modules that align to your use case, you can simply type the keywords into the search. For this example, we’re building a license dashboard and will search for “license.”
The search will pull up all of the existing widget items available. When you find what you need, you can either click Add to Dashboard or drag it onto the dashboard. Because the dashboard we are building is SAM License Management, the License Management module is a good starting point.
Once the module is added, you can look at the information and determine whether it lines up with your needs or you want to customize it further. Continuing our example, this module works pretty well. But there’s no need to keep Direct Integrations to Connect, because it’s included in a different dashboard and isn’t important for this use case. We’ll delete the widget and go back into the widget library.
Instead, we’ll create a widget for SAM-owned applications. To do so, open the widget library and click Build New Widget.
There are six types of chart types you can choose to display your data: bar chart, pie chart, stat card, gauge, table, and calendar. If you hover over each one, you get a preview of the widget. Click on the type you want and select Build Widget. For our example, we’ll use a stat card to display the number of SAM-owned applications inside of my company.
Once you select a chart type, you’re going to be presented with a number of different data objects. Most of the time, you’re likely going to use Applications unless you have a really specific use case, in which case the name should align.
To build our SAM-owned app widget, we’ll select Applications. That brings you to an unfiltered view of all of the applications inside of your account. There are two things that you can do next.
Select the field you want to analyze in the drop down. To build our SAM-owned app widget, we’ll use App Label.
Next select the metric. There are a few options to choose from, and it’ll be different depending on if it’s numerical data or text. In this case, we care about total results.
Once you’ve input that information, you’ll get a preview that’s going to follow along as you finish building the widget.
Next, give the widget a name. We’ll call our new widget SAM-Owned Applications, and give it a description so other users who check it out know what’s going on. Finally, select Complete Widget, and you’re finished.
Now, the brand new widget is on the dashboard, and all you have to do is drag it to where you want it to display.
That’s building a custom dashboard from scratch! For a deeper dive, check out the dashboard section in the Knowledge Base. And as always, feel free to reach out to your CSM or your SAE if you have any questions.
ABOUT THE AUTHOR

Thom McCorkle
As Zylo's Director of Product Marketing, Thom is responsible for leading Zylo's product marketing strategy and execution with a passion for aligning customer needs and Zylo's value into everything we build and launch. He brings 7+ years of experience working with Zylo's customers and prospects with various roles from leading Customer Success to enablement and sales/solution strategy.

Table of Contents Toggle3 Pre-Built Dashboards in ZyloAnalytics DashboardZylo Value Framework...
Table of Contents ToggleWhat Is a Saved Filter?Use Cases for Saved...
Table of Contents ToggleWhat Are Automated Reports?What Do Automated Reports Look...
Table of Contents ToggleWhat Is Automated Alerts?Old Alerts vs Automated AlertsAlert...
| Cookie | Duration | Description |
|---|---|---|
| cookielawinfo-checkbox-analytics | 11 months | This cookie is set by GDPR Cookie Consent plugin. The cookie is used to store the user consent for the cookies in the category "Analytics". |
| cookielawinfo-checkbox-functional | 11 months | The cookie is set by GDPR cookie consent to record the user consent for the cookies in the category "Functional". |
| cookielawinfo-checkbox-necessary | 11 months | This cookie is set by GDPR Cookie Consent plugin. The cookies is used to store the user consent for the cookies in the category "Necessary". |
| cookielawinfo-checkbox-others | 11 months | This cookie is set by GDPR Cookie Consent plugin. The cookie is used to store the user consent for the cookies in the category "Other. |
| cookielawinfo-checkbox-performance | 11 months | This cookie is set by GDPR Cookie Consent plugin. The cookie is used to store the user consent for the cookies in the category "Performance". |
| viewed_cookie_policy | 11 months | The cookie is set by the GDPR Cookie Consent plugin and is used to store whether or not user has consented to the use of cookies. It does not store any personal data. |